Device Association
It is here that you connect your project programming in Designer with real, networked Pharos devices:
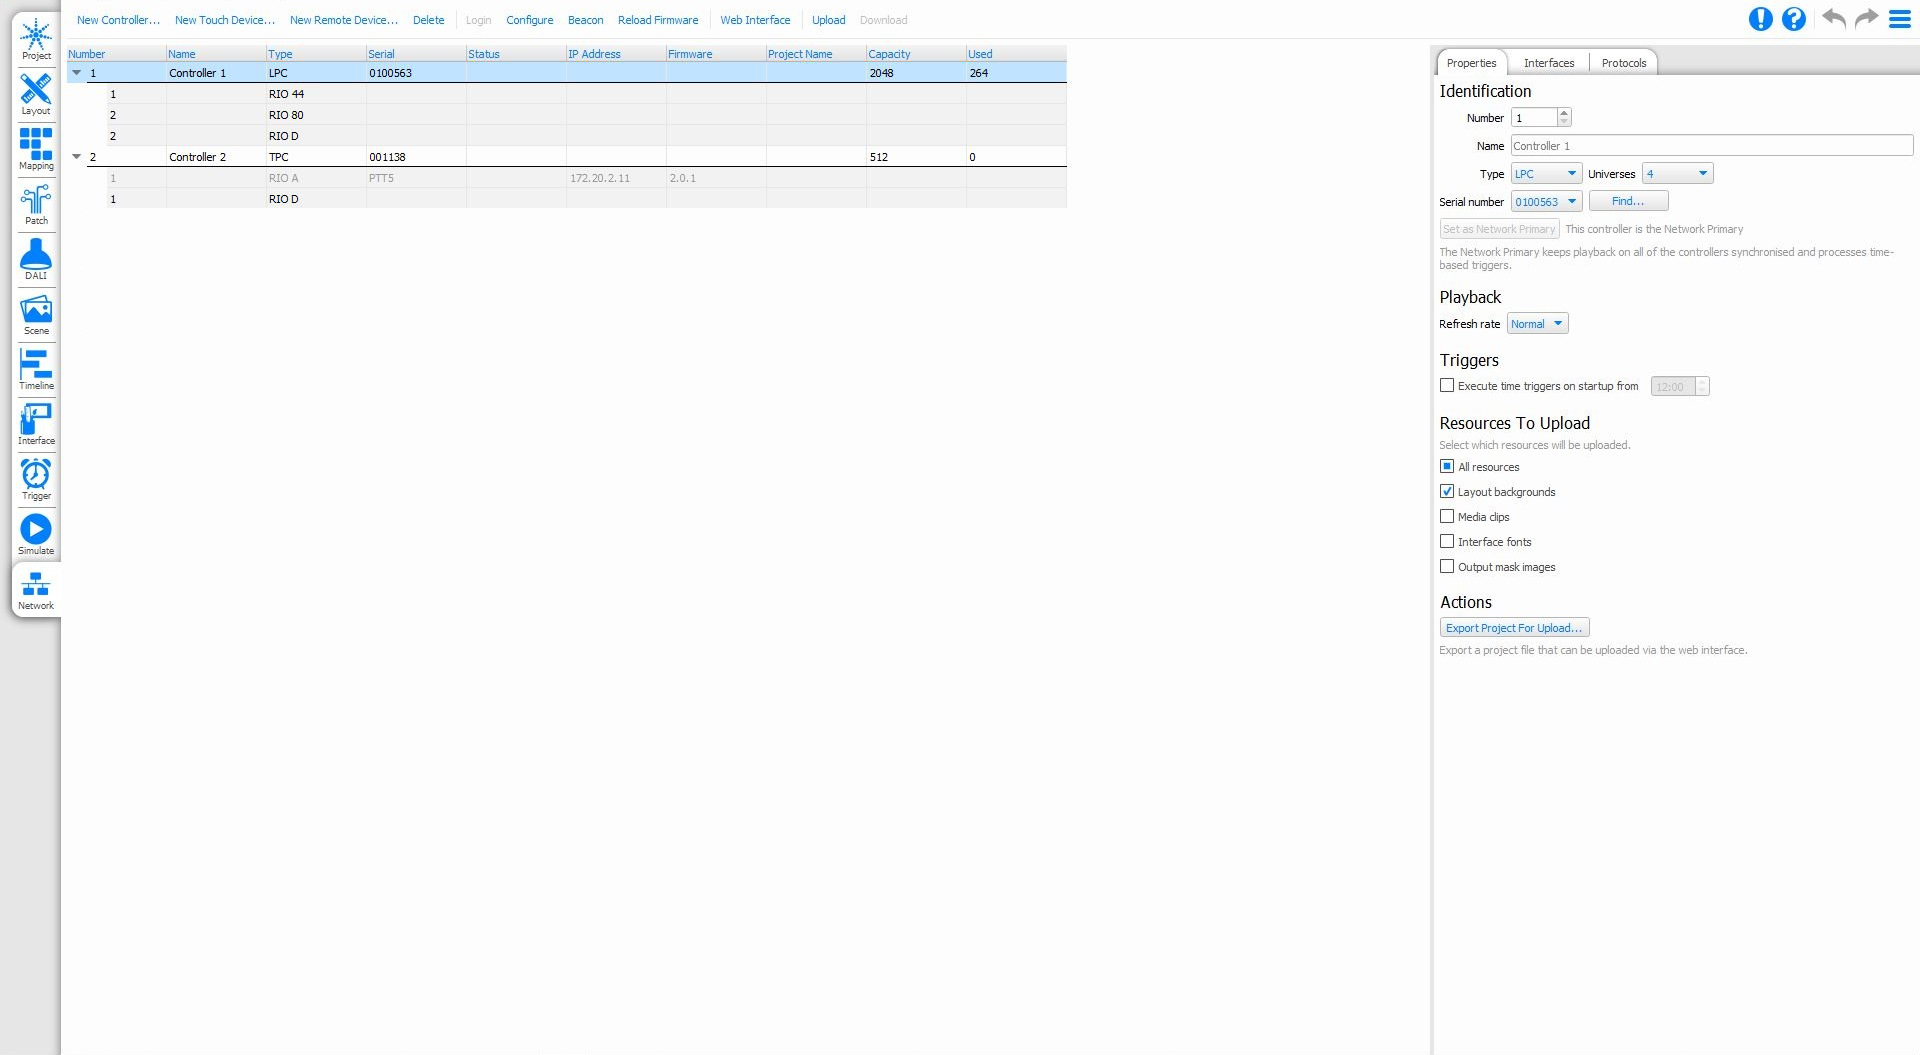
Project vs Real Devices
The list of Devices is split into two sections: At the top is the list of project Devices which may or may not be associated with real Devices. Underneath is a list of all the unused real Devices found on the network that have not been associated with project Devices.
When you create a new project, it will have one or more Devices in it. These Project Devices are purely virtual and so must be associated with a real Controller on the network before you can Output Live or Upload.
IMPORTANT: You can only associate a Controller running the same firmware The embedded operating system, stored in internal flash memory or on the memory card. as Designer - Devices running incompatible firmware will be displayed in red. To update a connected Device's firmware see Controller firmware.
Managing project Devices
If you will use a different type of Controller for your project, such as an LPC X for a high DMX channel count, or more than one Controller if the installation is large or distributed, then you will want to modify the list of project Controllers.
To Add and Set the Type of a Project Device:
- Press the New Controller or New Device button on the toolbar
- Select the Device's Type from the dialog, if this is a Touch or Remote Device, select the Controller to attach it to.
- Use the Properties pane to give the Device a useful name, perhaps describing where in the installation it is or what it controls
- If appropriate, select the number of universes that the Controller supports
The Device has now been added to the project.
If the project has a TPC with an EXT then the EXT will be configured automatically by the TPC. You can add an EXT to a TPC in the project by checking the 'Configure EXT' check box in the TPC's Interfaces tab.
Alternatively a physical controller can be added to the project by Right-clicking and selecting Add to Project.
To Delete a Project Device:
- Select the project controller, the row will highlight
- Press Delete on the mode toolbar
IMPORTANT: Deleting a project controller that has been patched will result in the loss of this patch data.
Managing Replicated Projects
An Install Replication is a set of settings that allow you to simply upload the same project to multiple sets of devices.
To Create an Install Replication
- Enable Install Replications in Project Features.
- Select Create Replication in Network
- Associate the replicated controllers with the Real controllers (see below)
Associating project Controllers with real Controllers
Once you have added and configured your project Controllers (all that is required for programming and simulating) you must associate them with real Controllers on the network.
To Associate a Local Controller:
- Select the project Controller, the row will highlight
- In Controller Properties use the Serial Number pull-down to chose a real Controller of the same type to associate (the serial number can be found on the base of the LPC 1, 2 & 4, TPC and rear of the LPC X)
- The real Controller will fuse with the project Controller so completing the row details
To Associate a Remote Controller:
If you know the IP address of a controller, you can use the Find button to input the IP Address of the controller directly.
This can be used to connect to a controller through a VPN connection or using port forwarding and a public connection.
Should this be the case, ensure that both Port 80 and Port 38008 are forwarded to the controllers local IP address.
To Identify a Device (Beacon):
- Select an associated project Device or unused Device
- Press the Beacon button on the mode toolbar, all the Device's status LEDs will flash. The screen backlight of a Touch Device will pulse.
- Press Beacon again to return the Device to normal operation
Once all your project Devices have been associated with real Devices you can configure them, test your programming on the installation itself and finally upload to the Devices for stand-alone operation.
Network Primary
One Controller in your project must be allocated as the Network Primary, the first project Controller added is chosen by default. The Network Primary is responsible for network playback synchronisation and for issuing realtime and astronomical clock triggers. To set the correct date and time set, see Controller Configuration.
To change the Network Primary:
- Select the project Controller which is to become the Network Primary
- Press the Set as Network Primary button in the Properties pane
Web interface tools
To View a Controller's Web Interface:
- Select the Controller
- Press the Web Interface button on the Controller toolbar
- Your computer's default browser will open the Controller's home page (or custom page if one has been created)
Device status
The fields in the device table provide status information:
| Number | The unique identifier given to each Device in the project |
| Name | The user name given to each Device in the project, typically a name that identifies the Device's purpose or location |
| Type | The type of Device |
| Serial | The Device's serial number as found on the Device |
| Status | Indicates whether the Device is currently locked |
| IP Address | The Device's IP address which is either statically assigned or obtained from a DHCP server |
| Firmware | The Device's firmware version which must match that of Designer |
| Project Name | The name of the project that has been uploaded, as defined in the Project properties, or the project's file name. |
| Capacity | The number of available (unused) channels on a Controller |
| Used Channels | The number of used (patched) channels on a Controller |